Friday, June 05, 2009

Paris: Having a great meal based on sparse word knowledge

Somewhere hiding out in one of the ten or twelve boxes of books I have packed away awaiting my forever delayed move back home in Los Angeles is a tiny book called Marling Menu-Master in French.

This tiny pocket guide on my two previous trips, it turns out, had been both a God-send and culinary crutch.

At dinner two, on June 4, 2009, I went to I lovely little place nearby my chambre d’hotes called Chez Casimir. This brightly yellow card and its somewhere-off-Eastern-sounding name made me think I was in for north African fare.

After all, I am always in search for one great north African meal when in Paris. However, as soon as I entered the corner locale I knew it was a typical neighborhood traditional French restaurant. As it turned out, I was going to be the last customer, Casimir took that evening.

The menu was fixed price, which I always prefer in Paris. You know how much up front. That is so much better in Paris as well as in all of life.

Now let me digress. I have a problem with my brain. I cannot, no matter hard I try, remember things in French. I have a few words committed to memory in Russian from many years ago when I took it in college. I have the Hebrew alphabet from the class as well, despite not being Jewish and never able to read the language; and I have perhaps 200 or so words at my grasp in Spanish. However, when it comes to French there is simply a traffic jam in my neural net.

It may be the many accent marks used. It may be that the pronunciation is vastly different to my ears than any other language has been. It may be simply a lack of commitment on my part – no class, no time to study, no true practice and rehearsal.

So, Casimir brings his handwritten black board over to me and begins rattling off the lengthy menu and I need to interrupt because I do not understand. And I say: If you please, English.

This phraseology is particularly offensive I have discovered. But what is worse, is I think I am saying: do you speak English? So, the host reacts badly and I react confused and everything goes down hill very quickly.

Well, Casimir, says, pretty much, this is the menu, huh, its fixed price, and you let me know, ok. And he walks away. I feel terribly because the fifty times I have said parle vous anglaise? In my head throughout the day has failed with the utterance s’il vous plait, aiglaise?

So, I sit there. Me on one side of a bistro table and a giant blackboard in the other chair. I need only a dunce cap.

Then I realize, my Marling Menu-Master in French would have saved the day, but alas the heretofore unforeseen complications of the move from apartment dweller to mortgage prisoner shows itself in a new way.

So, I decide, as all culinary survivors must, to pick words I know.

In course one: Of the seven choices, I know – canard (duck).

In the entrée course: of the seven choices, I know four – joue de beouf (beef cheek), saumon (salmon), poulet (chicken – I think) and something-something asperge (asparagus).

In the dessert course: of the seven choices, I know – chocolat, chocolat chocolat, frambois (raspberry) and rhubarbes (rhubarb).

So, I select: duck, beef cheek, and rhubarb.

Why?

Well, I thought, I was ordering duck and I got pate of duck, though it was amazing. A small, nicely dressed green salad with a ceramic jug of cornichons and a large portion of hunter-style pate. It was yummy to the last morsel on the thick-cut, heavy country brown bread.

With the beef cheeks, I had regretted for a year not trying them since my last visit. So, I was definitely going to have them this time. However, what I learned here was that a beef cheek in one restaurant is very different from the same dish in another. While flavorful and tender, the mashed potato was the star of this hearty dish.

Beef cheeks and my year of regret is why this time around I am trying new things and with this meal, while trying words I knew I ended up trying dishes I never had. Success!

This final dish, dessert, was the most different dessert I have ever had. I am still thinking about it. It is a trip. It is something that has wowed me but also I am not yet quite sold on it. It is an odd experience.

The rhubarb was served as a soup. All the rhubarb was green and stewed either very tender or even very desiccated. Then a series of plump and perfect in appearance and taste raspberries were placed in the soup. Next, a large cannel (ok, Americans a large scoop) of chocolate mousse was placed in the center; however, it was hidden by the fabulous and perfect cookie crisp that gently sit atop it.

I am not sure whether to simply think of this dessert as a religious experience to be remembered or a culinary experience to be copied and tinkered with or a food experience to be reinvented and made into my own.

There is something philosophical about this dish that makes me pause. It’s kind of freaky.

Wednesday, June 03, 2009

Italian neighborhood food in Paris

It is my tradition on my first night in Paris to dine close to my hotel. Had I been in the old neighborhood, I would have walked to Alla Biche Au Bois or Chez Paul or maybe tried the Egyptian place I have eyeballing for some time.

However, my hosts and dear friends have moved to the 10th arrondissemont and so I was left to go with neither a favorite or something I have previously desired.

So, I decided on a safe and sure bet: Italian.

It was recommended by my sub-host, the cuddly Bertino. Men are not usually cuddly to me, but he seems very kind and sweet. His broken English, laden with a heavy Portuguese accent. He bore witness to its fair prices and its decent fare. So, I decided it would be the Italian place. One block away.

I readied myself and off I went with my travel materials for reading. In the short block of walking, I realized two things that one forgets about Paris when you separated from it for too long a time: a) the names of streets can change with every single block and some streets name can curve in the most illogical of manners; b) Paris is bright late into the night. At 9:00 it is still fairly light out.

The chilled late spring air tell me I ought to sit inside and once I am seated I know a place outside would have been a tinge better.

I review the menu. The salads are very unusual. Three of them are named for places like Florida, Arizona and the Bahamas. I read each ingredient carefully.

The Florida has grapefruit, avocado, apple, heart of palm, chicken, tomato and corn. The Arizona has carrot, cucumber, artichoke, capers, egg, tuna, anchovies and olives. And the Bahamas has oranges, tomatoes, avocado, heart of palm, corn, ham and fresh pineapple.

However, I remembered that last meal I had in Paris last year. I ordered something I order a lot. My dear friend Peet ordered beef cheeks. I would never order such a thing, but once I tasted his dish – Oh, My God! So, I said to my self: “Self, order different things than you normally would!”

So, I ordered the Rimini salad which has orange slices, crayfish tails, hearts of palm, tomatoes, and kiwi, oops no kiwi showed up on my plate! However, it was great and I have in my head concocted an even better salad of my own making, though inspired by Salade Rimini alla Parisienne.

For the entrée I ordered as the menu says: “green and white pastas with light creams sauces, fresh peas, mushrooms and ham of San Daniel.”

The spinach and durum wheat linguini was served in a large portion. Much larger than I have had in some places in Madrid and Paris, which I was grateful for however, I will have to research what ham San Daniel is. Roughly chopped cold cuts seems like a missed opportunity. Of course, that came out the wrong way. It looked like a roughly chopped cold cut, it tasted like the best ham I have had in a very, very long time. Think Boar’s Head Brand and then a step or two up.

The only downside to this dish was the peas, which were fresh, were also a bit over-soft. It would have been perfect to have a bit of a snap left in them!

I will return to this little eatery, I am sure, a couple of times in my two weeks here. It is very much a homey place. Besides some of the pizzas smelled amazing!

Labels: , , , ,

Monday, August 21, 2006

Fried Corn with Thyme, Shallots & Chilies


Fried Corn with Thyme, Shallots & Chilies (Serves 4-6)

by dale reinert

Ingredients
4 Tbls unsalted butter
4 shallots, finely chopped
1 red chile, finely diced (or 1\4 tsp red chile flake)
1 32-oz package frozen petit, yellow corn (defrosted and drained)
3 Tbls fresh thyme leaves, chopped
Kosher salt
Pepper

Procedure
  1. Melt butter in a heavy frying pan or chef’s pan. When hot, add the shallots and cook until translucent and tender, about 2-3 minutes.
  2. Add the red diced chile and stir for about 2 minutes more.
  3. Add the corn and fry for 10 minutes or until heated thoroughly. Then add the thyme, salt and pepper and continue to stir another 2-3 minutes.

Corn Stuffed Baked Onions


Corn Stuffed Baked Onions (Serves 6-8)

by dale reinert

Ingredients
6 medium sweet onions
12 oz. frozen corn (and peppers, if possible)
2 Tbls. butter
1 can cream of celery soup
8 oz. cup sharp Cheddar cheese, shredded
Salt and pepper to taste

Procedure
  1. Cut the top third off of each onion and peel the outer layer. Trim the root end so the onion will sit upright and stable in a baking dish.
  2. Using a paring knife and teaspoon or a melon baler, gauge out the center of the onion, creating a cavity to be filled by the corn stuffing.
  3. In a 2 quart bowl, mix together the corn and peppers, soup, and most of the cheese. Reserve some for topping the onions. Mix together.
  4. Melt the 2 tablespoons of butter and brush the onions inside and out to encourage browning.
  5. Fill the cavities with the stuffing mixture and top with the remaining choose.
  6. Bake at 400 degree until the onion is golden brown on the outside and very tender throughout and the filling is bubbling.

Corn on the Cob Basics, Plus Butter Applications


Corn on the Cob Basics, Plus Butter Applications

by dale reinert

How to Boil It…

Remove all the husks and silk form the corn. Leave about a 1-2 inch stalk at the end as a holder, if you don’t have corn-on-the-cob holders.

  1. Place corn in a large pot, cover with cold water, add three teaspoons sugar and one teaspoon salt. Place on high heat and bring to a boil for 3-4 minutes.
  2. Turn the heat off. Remove cobs as needed. Corn can remain in water for up to 90 minutes without becoming tough or overcooked.

How to Grill It…

Cut the silky end of the ear with a very sharp knife. Then submerge the ear in a large container of water for at least one hour.

  1. Preheat the grill to medium or medium high. Place the soaked ears on the grill in a single layer, turning a quarter turn every ten minutes.
  2. Using a tongs, remove the ears from the grill to a waiting platter. Peel back the husks and silk with oven mitts or a fork. While silk is often very hard to remove from raw corn, it comes away freely from steamed cobs.
  3. Roll in butter, sprinkle with salt and pepper, and enjoy.

Compound Butters…

Sometimes, for a change of pace, it’s nice to switch out regular sweet butter for a compound butter – or a butter that has had flavors added to it, like the three the follow and is pictured here from left to right.

Basil Butter
1 stick soft unsalted butter
3 Tbls prepared basil pesto sauce
3 Tbls grated parmesan cheese
1 tsp lemon juice

Chili Compound Butter
1 stick unsalted butter
2 tsp chili powder
1 tsp ground cumin
1\2 tsp Tabasco sauce
salt and freshly cracked black pepper

Lemon-Thyme Butter
1 stick unsalted butter
10 chives, minced
2 shallots, minced
1 tsp minced fresh thyme leaves
1 teaspoon freshly squeezed lemon juice

Mexican Corn Cake


Mexican Corn Cake (Serves 12-15)

by dale reinert

Ingredients
3 eggs
1 1/2 cups yellow corn meal
2 tsp baking soda
1 cup of cream style corn
1/4 cup of oil 1 cup of buttermilk
1 medium onion chopped
1 green bell pepper 2
red jalapeno peppers, seeded and chopped
8 oz. pkg. of shredded extra sharp cheddar cheese, divided
1 tsp kosher salt

Procedure
  1. Mix the ingredients in this order adding half of the cheese in the batter.
  2. Pour the batter into an oiled cast iron skillet or a dark metal 9x13 inch greased and floured baking pan.
  3. Top with the other half of the cheese. Bake at 375 degrees for about one hour for the iron skillet and about 50-55 minutes for the baking pan. (This cake is designed to be very moist. For a drier cake, sautee all the veggies to remoe their moisture.)

Wednesday, August 16, 2006

The Grown Up Taste of Rhubarb


The Grown Up Taste of Rhubarb

by dale reinert, food editor

I just didn’t understand it. I was nine years old and tears were streaming down my cheeks as the east wall of the garage came crashing down on my first veggie patch. What I did understand was my parents’ care in making sure that not a single shingle or rusty nail land on the southern side of the garage where the rhubarb stalks stood.

Back on the eastside my tomatoes were crushed; my cucumbers smashed, but the southern wall as braced and gently nudged so it would collapse northward.

Rhubarb is beyond bitter. It’s sour, sour, sour. I am often amazed that humankind ever figured out how to make use of it, like the thistle-like cardoons. As an adult, however, I have come to understand how the sweetness of sugar (or strawberries) plays so wonderful against the backdrop of rhubarb. Here are some of my favorite Midwestern dishes made by some of my Midwestern favorite people.

Rhubarb Crunch (Aunt Glenda's)


Aunt Glenda's Rhubarb Crunch

by glenda reinert,
sherrill’s mound, iowa

Ingredients
8 cups rhubarb, chopped 1\2-1 inch cubes
2 cups white sugar
2 cups water
4 Tablespoons cornstarch
2 teaspoons vanilla
2 cups all-purpose flour
2 cups brown sugar
1 cup margarine
1 1\3 cup oatmeal
2 teaspoon cinnamon

Procedure
  1. Preheat the oven to 350 degree. Mix the flour, brown sugar, margarine, oatmeal and cinnamon together. Press two thirds of this mixture into the bottom of a 9”x13” cake pan.
  2. In a microwave or a saucepan, bring to a boil until thickened the white sugar, water, cornstarch. Stir thoroughly every couple of minutes. Once thicken, stir in vanilla. Pour over the rhubarb.
  3. Spread the remaining crumb mixture evenly across the pan and bake for 45-50 minutes. Serve with vanilla ice cream.

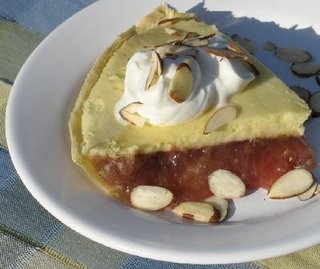
Cream Cheese Rhubarb Pie (Aunt Jodi's)


Cream Cheese Rhubarb Pie


by jodi reinert,
dubuque, iowa

Ingredients
4 cups rhubarb, chopped into 1\2-1 inch cubes
1 cup sugar
3 Tablespoons cornstarch
1\4 teaspoon salt
1 (9-inch) unbaked pie crust (see recipe below)
1 (8 ounce) package cream cheese (at room temperature)
2 eggs
1 cup sour cream
1\2 cup sugar
Almonds (slivered) for garnish

Procedure
  1. Preheat oven to 425 degrees. In a sauce pan over medium heat, cook rhubarb, 1 cup sugar, cornstarch, and salt. The mixture must boil, so the cornstarch will thicken, but it is not essential that all the rhubarb cook down.
  2. Pour this mixture into the waiting pie crust. Bake 10 minutes and remove form oven. Reduce the oven’s setting to 350 degrees.
  3. In a mixer’s bowl, on medium speed, beat the cream cheese, eggs, and a 1\2 cup sugar until smooth. Pour over the rhubarb mixture and spread evenly.
  4. Bake the pie for another 30-35 minutes until set. Allow to cool and serve chilled. Garnish with sour cream and toasted almonds to serve.

Rhubarb Cake (Mom's)


Mom's Rhubarb Cake


by betty reinert
hazel green, wisconsin

Ingredients
3 cups rhubarb, chopped into 1\2-1 inch cubes
1 1\2 cups brown sugar
1\2 cup butter flavored shortening
2 eggs
1\2 teaspoon salt
1 cup milk soured by 1 tablespoon vinegar
1 teaspoon baking soda
2 cups flour
2 teaspoons vanilla

Topping
1\2 cup sugar
2 tablespoon cinnamon

Procedure

  1. Preheat the oven to 375 degrees. Butter and flour a 9”x13” inch cake pan.
  2. Cream the sugar and shortening. Add the eggs and salt. Stir in the soured milk, soda, vanilla and flour. Pour the batter into the bake.
  3. Even spread the rhubarb across the top of batter and sprinkle with the cinnamon-sugar topping. Bake for 30 minutes or until a knife can be inserted and removed cleanly.

Tuesday, August 15, 2006

Dale's Veggie Burgers


Dale's Veggie Burgers

Serves about 12

Ingredient
2 large portabello mushrooms, chopped and sauteed
1 can black beans, divided
1 medium potato, boiled, cooled (about 1 cup by volume)
1 cup carrots, grated
3 cloves garlic, minced
1 cup diced onion
2 eggs plus 1 egg white
1 cup whole wheat flour
2 cup quick cooking oatmeal
1\2 cup sour cream
1\4 cup ketchup
1 Tablespoon Steak or BBQ Sauce
2 Tablespoons Canola oil
1 Tablespoon Italian seasoning
4 Tablespoons Italian parsley chopped
1 Tablespoon Cilantro, chopped
1\4 Jalapeno pepper, finely diced
1 teaspoon salt
3\4 teaspoon pepper
Healthy pinch of cayenne

Procedure:
1. In a food processor, blend together the cooked mushrooms, 1 cup of the black beans,
potatoes, eggs and egg white, and onions until thoroughly blended.

2. Place the rest of the bean and all the remaining ingredients in a large bowl. Transfer the blended the mixture from the food processor to the bowl and stir well until all the ingredients are moistened and combined.

3. Heat a large, deep-sided chef’s pan over medium high heat with 1\2 cup of canola oil. Using a large serving spoon or a 3\4 cup measure, drop the veggie burgers onto the heated pan. A spatula can be used to shape and flatten the burgers into rounds for traditional hamburger buns or narrow ovals, like hoagies. Flatten the burgers to make sure they cook through. (For mini-burgers, use a #20 food disher.) Cook on each side for 3 minutes.

4. Serve with your favorite condiments. Instead of ketchup and mustard, I use peppercorn ranch dressing and barbecue sauce for veggie burgers.

Outdoor Burgers -- Hamburgers for the Grill


Outdoor Burgers

Serves 3-4

Ingredients
1 package 85% lean ground chuck, about 16-20 ounces
1 teaspoon granulated garlic
1 teaspoon granulated onion
1 teaspoon kosher salt
1 teaspoon ground white pepper
3-4 buns, toasted and prepared

Procedure
  1. Preheat the grill on high heat. When it is thoroughly heated, scrap the grates clean and lubricated lightly with oil. Keep the lid open for a few minutes and reduce the burner heat to medium high.
  2. In a large bowl, using your hands gently but thoroughly combine the meat and all the seasonings. This must be done both quickly and thoroughly as you do not want the heat of your hands to start to chemically change or physically alter the characteristics of the meat.
  3. On pieces of wax paper or parchment, trace a circle around the bun bottom. Repeat three or four times, depending on the number of burgers. Turn each piece over.
  4. Using two dinner forks, shape the burgers into round about 3\4” high and 1\4” bigger than the drawn circles. This accounts for shrinkage. Do not use the forks to press and push down on the burgers. Use them to shape, sculpt, and nudge.
  5. Spray vegetable oil on the burgers, invert onto the hot grill, spray the top side with vegetable oil for 1 second, and leave alone for about 4 minutes. Turn the burgers over and cook for 3-4 minutes more.
  6. Add pre-buttered – I prefer mayo – buns to the grill. When the burgers reach an internal temperature of 155 degrees, remove to a platter and let rest for 10 minutes. Remove the buns to a plate. Keep an eye on the buns, they toast very quickly.

Apartment Burgers -- Hamburgers for the Stovetop


Apartment Burgers

Makes 2 Dale-sized Burgers.

Ingredients
16 ounces chuck, trimmed, cut into 1-inch cubes
1\2 teaspoon garlic powder
1\2 teaspoon onion powder
1 teaspoon kosher salt
1\2 teaspoon ground white pepper
1\4 teaspoon cinnamon

Procedure
  1. In separate batches of about 4 ounces, pulse the cubed chuck roast in a food processor 10 times. Each pulse must be a purposeful pulse, not a quick pulse. At the end of ten pulses, if the meat does not look like hamburger, then keep pulsing.
  2. Combine the meat and seasonings in a large bowl. Form the mixture into an 8-ounce patty about 3\4 of an inch thick. Heat a cast iron skillet or heavy-bottomed frying pan over medium-high heat for 2 to 3 minutes. Oil the pan with 1 tablespoon of canola oil.
  3. Place the hamburger patties in the pan. For medium-rare burgers, cook the patties for 4 minutes on each side. For medium burgers, cook the patties for 5 minutes on each side. After two minutes, loosen the burgers with a spatula, but flip the burgers only once during cooking process.
Why grind your own burger meat?
With all the concerns of e.coli bacteria, eating rare ground beef is a luxury many of us avoid. Well, e.coli exists only on the surface of meat and buying pre-ground meat means there is a lot of surface area. Grinding meat in your food processor minimizes the risk and provides a great food experience in the home.

Monday, August 14, 2006

Spaghetti Rigati with Curly Endive, Garlic and Balsamic Vinegar

Spaghetti Rigati with Curly Endive,
Garlic and Balsamic Vinegar


Ingredients:
1\2 lb Spaghetti
4 Garlic cloves, sliced
3 Tbls. Butter
3 Tbls. Olive oil
4 heads of curly endive, tops trimmed into bite-sized pieces, discard the rest
2 Tbls. Balsamic vinegar
1\2 tsp. of each Salt & pepper
Red Pepper flakes, if desired

Procedure:
  1. Boil one gallon of heavily salted water. Cook the spaghetti until it is “al dente.” (It will cook more again in Step 4.)
  2. Once a large chef’s pan has been heated, add the olive oil, then garlic and finally the butter. This is the time to add the red pepper flakes, if you want.
  3. Toss the curly endive tops in the heated oil, the vinegar, salt, and black pepper, cook for a moment, and then remove from the heat.
  4. Drain the pasta; add to the chef’s pan. Stir to combine. If it is too dry, then, add a ladle of water from the pasta pot. Divide in to 2 portions and serve.

Escarole Chicken Soup


Escarole Chicken Soup

Ingredients
2 cans chicken stock, 41 ozs. each
4 bone-in, skin-on chicken breasts
1 can garbanzo beans, drained and rinsed
1 can diced tomatoes, drained
2 medium onions, chopped
3 carrots, chopped
3 celery ribs, chopped
1 bay leaf
2 tsp. dried oregano
1 lb. escarole coarsely chopped (about 4 small heads)
8 cloves garlic, chopped
2\3 cup rice

Procedure
  1. Preheat oven to 400 degrees. Thoroughly salt and pepper chicken breasts and place on a baking sheet in the center rack for 40 minutes. Allow to cool 30 minutes, discard bones and skin. Pull chicken apart into bite size pieces and set aside.
  2. Chop onions, celery, carrots and garlic. In a heavy bottomed soup pot, heat oil. Sautee garlic, onion, carrots, and celery until tender.
  3. Wash escarole making sure to remove all dirt and sand, and then chop coarsely. Add oregano, stock, bay leaf and escarole to the pot and bring to a boil. Reduce to a simmer. Add the rice and cook for 20 minutes or until done.
  4. Add the chicken, tomatoes and garbanzo beans. Adjust salt and pepper to taste. Bring up to heat.

Endive Boats with Black Pepper Bacon, Whole Grain Mustard Gouda and Port-fortified Cranberries

Endive Boats with Black Pepper Bacon, Whole Grain Mustard Gouda and Port-fortified Cranberries

Ingredients
8 slices thick black peppercorn bacon, fried, drained and cut into 1\2 inch pieces
4 Belgian Endives, root-end trimmed, leaves separated and cleaned
8 oz. whole grain mustard Gouda cheese, sliced into long, thin strips
1\2 cup dried cranberries
5 Tablespoons honey
1 Tablespoon Balsamic vinegar
1 cup port wine

Procedure
  1. Place port wine, cranberries and honey in a small sauce pan. Bring to a simmer allowing the cranberries to plump for about 10 minutes. Remove the cranberries with a slotted spoon, then reduce the fortified wine to a syrup.
  2. Preheat the oven to 375 degrees. Place the bacon on a baking sheet with 1-inch sides. Bake the bacon until golden brown. Remove from the sheets, drain on paper towels and cut into 1\2 inch pieces.
  3. Cut about 1\2 inch of the root end of the endive. Gently separate the leaves. Using a damp cloth wipe clean the leaves large enough to hold all the other ingredients.
  4. Slice the cheese into at least as many pieces as leaves you cleaned.
  5. On a serving platter, placed shredded curly endive or baby mixed greens as a garnish and then nestle endive boats. On top of each boat, place bite size piece of cheese and bacon, 2-3 cranberries, and a light drizzle of the reduced wine syrup.

Sunday, August 13, 2006

Chewy Chocolate Chip Cookies


(This article originally appeared in the April 2006 issue of La Brea Living Magazine.)


Chewy Unboxed
by dale reinert, food editor


The early April afternoon on my way home from school was the first time that spring the warm sun truly foretold that spring could no longer be held at bay.

It was turning out to be as a momentous a semester as my teacher had promised. Flight Four, the fourth grade field program, had started with a tour of the Hamm House Museum and Log Cabin, which was way cool to me – boring to most other fourth graders. The week previous, my first hospital stay meant being absent from my own first communion party. My ogling, over-perfumed aunts couldn’t squeeze my cheeks; I wouldn’t have to be the center of attention (which I hated more that almost anything); and I didn’t have to deal with being nice in a big crowd.

Nope, just sitting in a hospital room, watching TV and eating endless Jell-O and ice cream was fine by me.

But, today I was, my mom had said, going to be special. She had forewarned warned us my father’s return to work some weeks previous meant a real paycheck today and that we would be having something other than government block cheese, bologna, and Wonder bread for dinner. I couldn’t wait.

So, I walked along the playground fence and slapping my hand along the steel diamonds of the hurricane fence, thinking tonight’s dinner might be steak. I passed the three big stone houses that shared the block with the schools and figured dinner is likely to chicken, one paycheck in seven months likely won’t go far after bills are paid.

Rounding the corner at Old Man Alba’s Store, I remembered mom’s fondness for bananas – he always kept a bin filled out front -- and figured she’d make some banana bread or at least buy a bunch of them to cut up on top of ice cream before we stirred heaping teaspoons of Nestlé’s Chocolate Quick Mix into it. We love to do that when we would squeeze that out of the grocery dollars.

Just one more long block and a corner. And I thought I could smell something. But what was it? Hamburgers? Big old messy homemade whoppers like that made over at the Lange’s – with slices of tomatoes and onions and crunchy lettuce? Sniff. SNIFF. Nope. No scent.

I walked up the three steps of the back porch leading to the kitchen, opened the door and before my eyes was spread across the table boxes and boxes of baked goods from the outlet store – Archway cookies and Little Debbie cakes. In 1974, these were fine eats, especially to a nine year-old who had been told that they’re too expensive every time he saw them in the grocery store.

Dad simply said, “Go ahead, sit down, pick a box, enjoy. This ain’t never gonna happen again. Everything was half price.”

I grab a box of Archway molasses cookies. Chewy, earthy and nutty. The next day I ate another kind of chewy cookie. Another day, another variety. I fell in love with chewy cookies. Up to that date I had only had crunchy cookies and since then I have only loved chewy cookies.

Why were all the cookies in the whole universe crunchy, except the cookies made by Archway, I wondered? Below is a basic chewy cookie recipe with some simple additive and some extra tips. Enjoy!

Chewy Cookie Dough

The Dry Ingredients:
2 1\4 cups bread flour or flour of bread machines
1 teaspoon fine grain salt
1 teaspoon baking soda

The Wet Ingredients:
2 sticks unsalted butter, melted and cooled to room temperature
1 1\2 cups brown sugar
1 egg
1 egg yolk
2 tablespoons whole milk
2 teaspoons vanilla (please use high quality)

Flavor Options:
Equivalent of 2 cups of the following flavor combinations:
  • Semisweet chocolate chips with or without walnuts
  • Macadamia nuts with white chocolate chips
  • Chopped Andie’s Mint Candies
  • Chocolate\Caramel chips with pecans
    Peanut butter chips rolled in cinnamon and sugar
      Procedure
      1. Heat oven to 350 degrees Fahrenheit.

      2. Melt the butter in a heavy-bottom small saucepan over low heat. Pour the melted butter in the mixer's work bowl. Add the sugar and brown sugar. Cream the butter and sugar on low speed. Add the egg, yolk, 2 tablespoons whole milk and vanilla extract and mix until well combined.

      3. Sift together the bread flour, salt, and baking soda. Slowly incorporate the flour mixture until thoroughly combined.

      4. Stir in the 2 cups of flavor options you decided on.

      5. Chill the dough for at least one hour or (preferably) overnight, and then scoop onto parchment-lined baking sheets, about six cookies on each sheet. I use about 2 or 2 1\2 heaping kitchen (not measuring) tablespoons per cookies – these are big cookies – just shy of a quarter of a cup measure.

      6. Bake on the middle rake of the preheated oven 11-13 minutes or until golden brown, checking the cookies after ten minutes. It helps with most ovens to rotate the baking sheet to ensure even browning. Cool completely and store in an airtight container.

      Tips and Hints:
      A. The length of time you chill the dough and the size of the cookies impacts how long you will bake the cookies.

      B. The flavor options you decide on will impact how much the cookies spread when they cook. This is true for a variety of reasons, like the amount of edible wax manufacturer’s use in their product and how some ingredients interact with others.

      C. Half of all the cookies made and consumed in America are chocolate chips, so start with that and expand there.

      Chocolate: If you want to make the chocolate-chocolate chip cookies pictured here, then reduce the amount of flour by 1\4 cup and stir 1\2 cup of Dutch-processed cocoa and 1 tablespoon instant coffee into melted butter. Roll the dough into powdered sugar before baking.